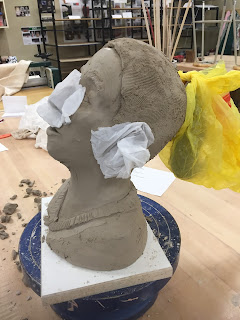
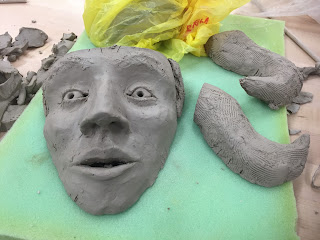
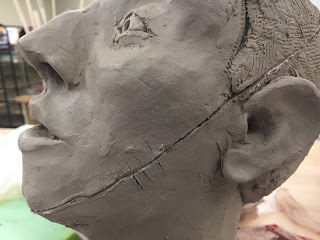
the ear was moved between the first and the second picture to be placed more accurately
Last week I spend three days on videos for flipping my hand-building class. I demonstrated a whole range of things, from rolling slabs, using the extruder, and using coils to glazing and clean up.
 |
| the armature, pulled out the the partially disassembled bust |
Several of the videos I did for my flipped class video project showed the process of building a human bust on an armature. For the videos, I demonstrated all the steps starting with showing some armatures and explaining how to set them up.
 |
| the head after eyes and lips were partially shaped |
In separate videos, I demonstrated how to build up the thickness of clay on the armature; how to shape the head, neck, and chin; how to plan for the position of the eyes, ears, and mouth; how to make a reasonably convincing eye and add lips and ears; and how easy it is to adjust incorrect positioning and size.
 |
| the ponytail, nose, and ears were covered to facilitate slower drying |
On the second day, after he bust had dried some, I demonstrated keying and cutting the bust apart; hollowing out and measuring the wall thickness; and on the last day, putting the pieces back together and repairing the seams.
 |
| the bust ready to be cut apart |
This is always a tricky demonstration to do during class because it requires timing and requires me to work ahead of the students. I need to build wet, but then the piece needs to dry to about leather-hard on the outside before cutting. The interior is still wet, so it can be scooped out. It takes some time to scoop out all the wet insides and then the piece needs to be put back together.
 |
| cutting off the face to reveal the armature |
For the demonstration piece, I built up the armature the day before the first video, then set up a second armature for the first video and started on that one. But after the first video ended, I switched to my prepared armature to save time. The next video showed shaping the head and face. Then, with the camera off I did some more shaping between videos. I let the bust dry between day one and day two.
 |
| cutting out the extra clay of the head |
On the second day I cut apart the head and thinned out the top section and ponytail, but carved out the rest of the bust off camera. It took me most of the afternoon to finish carving out the bust and put the bottom sections back together.
 |
| the face and ponytail, cut off |
 |
| the face and ponytail hollowed out and the head waiting to be hollowed |
It was important to do my own videos of this whole process because I wasn't able to find what I needed online. The demonstration videos that I've been able to find online don't start simply enough for a beginning class and don't talk enough about drying, measuring thickness, and putting the whole thing back together.
 |
| the armature revealed |
I haven't viewed my completed video demonstrations yet, but I think each was probably in the 5-10 minute range and there were about 8 videos total for this process.
 |
| the bottom of the bust looks a mess before hollowing and clean up |
 |
| the neck scored with slip in place before putting the ear and chin section back on |
I enjoyed building the bust, but I was torn between wanting to get the thing done and wanting it to look good. I compromised a bit, not just because of time, but because I'd like to keep the bust in the studio as an example.
the inner seam of the neck, before and after smoothing
I know from experience, if the finished work looks too good, it sometimes wanders away. Luckily this one will be big and awkward to carry.
 |
| the keys on the cheek help me get the pieces back together correctly |
The last solid built form I made (start to finish, usually my demos are not completed because of time) for the studio was a small Maneki Neko (lucky cat) and it hasn't been seen in several years. I suspect it was too cute and now lives with some previous clay student with sticky fingers.
 |
| the piece ready for the last day videos |


No comments:
Post a Comment
Tell me what you think about my work or this post