It's finally getting interesting again, guys! I'm not
just under-glazing! I am still under-glazing, but that's not all I'm doing. I have fired three kiln loads of glazed work. That should mean I have three kiln loads of finished work ready to be either displayed or
epoxied to bike parts. I would like to say the finished work is ready to be photographed with a nice backdrop and careful lighting, but I have accepted that professional photos aren't going to happen in 2013.
 |
| under-glazed bulbs ready for glaze spraying |
One of the kilns is still hot. I will unload it tomorrow, but the other two loads came out and I started to epoxy the bike parts today. I'm still doing plenty of under-glazing, but I'm trying to prioritize the pieces that need to be epoxied first. The epoxy takes 24 hours to set, which means I have to add several days onto each
multi-part piece. I can't epoxy all the pieces together at one time; I need to start with the base and work my way up.
 |
| under-glazing table |
Most of this week I divided my time between under-glazing,
spraying glaze (in the cold), and loading and unloading kilns. I also went to school for most of a day to prepare my winter quarter classes. It felt a bit strange being back at school, especially because most of my colleagues were doing advising and the office was pretty empty.
 |
| glazed work waiting to be loaded into kiln |
Dividing my time this week was very nice, since I was able to balance the boredom and monotony of under-glazing with the freezing digits that result from loading the kiln or spraying glaze (both activities I do outside). The remedy for frozen fingers is sitting in the heat and applying underglaze. The remedy for a frozen brain is to load a kiln or spray some glaze.
 |
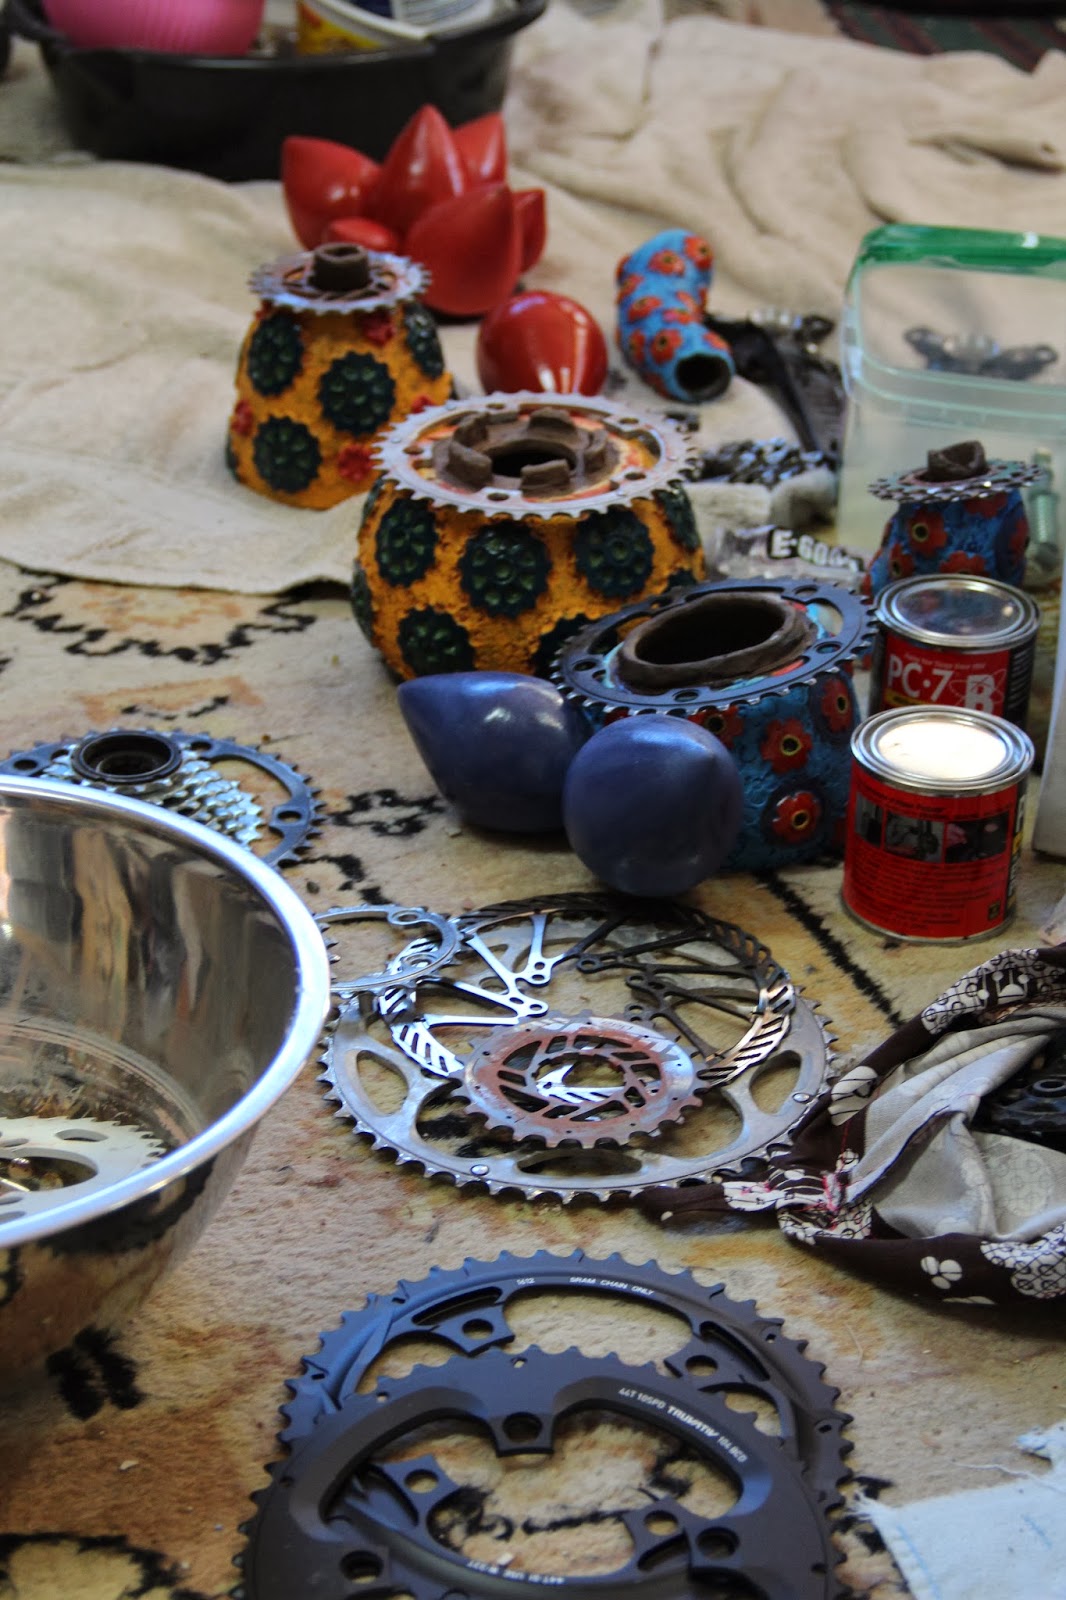
| sorting gears to find the best fit for various fired parts |
Today, though, I was able to start putting the bike parts and the fired clay parts together. This was loads more interesting, though a little scary, since I could actually make big mistakes at this point, or discover mistakes I made weeks or months ago.
 |
| testing the fit of a gear for this top element |
The first thing I had to do was match all the fired pieces with their bike parts. I ended up running back to the computer a few times to look at old pictures I had taken while I was building, just to be sure I had the right part in the right place.
I prefer the black gears (right) to the silver (left).
I've gotten a new box of bike parts from
Revolution Cycles since I built the work, so I was able to make some substitutions at this point if the new part was a better fit or had a nicer surface. I also found a new way to freeze digits. I took a few gears out to the wire wheel in the garage to buff them. Happily my husband had done this for most of the parts earlier in the year and I didn't have many to clean myself.
 |
| one of four orange bulbs to be added to this piece |
Once I had tested and checked the parts, I mixed up a big batch of
PC-7 (my favorite epoxy) and started sticking stuff together. The epoxy is a paste which stays pliably for a long time. This is good if I need to fix mistakes, but means that I need to be sure the pieces will stick together for a full day. I usually tape the pieces together to be sure they are positioned right, then leave the room so I won't bump them.
 |
| masking tape in place to encourage a correct fit |
The stacked pieces usually don't need to be taped, since gravity will supply the pressure and my interior support helps keep the pieces from shifting sideways.
 |
| black epoxy around the main contact point for the bike gear |
I usually try to err on the side of too thick when I apply epoxy, though I need to be sure the epoxy doesn't squish out the sides when I put two pieces together. Usually I can clean up any mistakes or excesses with a toothpick and some old phonebook pages. The phonebook pages don't leave fuzzies on the surface like paper towel does.
 |
| bike gear pushing into epoxy |
 |
| clay form added on top of bike gear and a second layer of epoxy |
This
sabbatical work is supposed to be a learning process for me, and I learned something quite valuable today. I only wish I didn't have to learn by actually making the mistake. I have one piece that seemed like a good idea, but now that I've fired it, I realize I should have made some serious structural changes.
 |
| Three long ceramic forms (hopefully) being supported while epoxy cures. The green towel is acting as a cushion between the two tallest forms. |
This asymmetrical piece may or may not make it out of the experimental realm. I spent at least 30 minutes trying to attach the top pieces to their gear today. I yelled at the piece about six times and I finally had to just stop and let the epoxy set as it was. The fit isn't quite right, but the major problem is my apparent disregard of physics. I guess I thought these tall forms would be held up by magic, because a small attachment at the bottom end, and at a severe angle, now seems dubious. I should have built in a few more contact points along the inside where the three long pieces naturally touch.
I tried to add epoxy to these contact points, but I was already holding up the pieces with bubble wrap, foam and masking tape, so they wouldn't all fall down. I couldn't reach the base without wreaking more havoc on the pieces. I know some of the epoxy at the base is visible and rough, but I'm not sure how much or how rough. Tomorrow's unveiling may be filled with tears, curses or relief, who knows.
 |
| My studio is littered with epoxied pieces and potential next steps. |


No comments:
Post a Comment
Tell me what you think about my work or this post